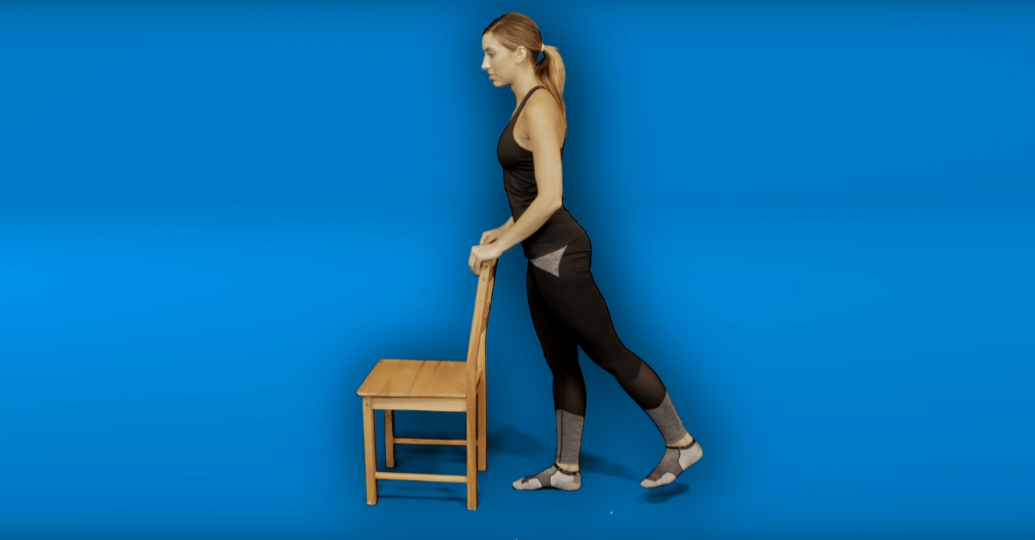
Video: Ejercicios de recuperación de reemplazo de cadera
Revisado por Dra. Sarah JarvisEscrito por Lilly Sabri, MHPCPublicado originalmente 15 Dec 2017
Cumple con las directrices editoriales
- DescargarDescargar
- Compartir
- Language
- Discusión
- Versión en audio
- Agregar a fuentes preferidas en Google
Existen diferentes tipos de cirugía de reemplazo de cadera dependiendo de la lesión, la gravedad de la lesión y el cirujano que realice el procedimiento. Este folleto debe usarse solo como una guía una vez que haya discutido y confirmado con su cirujano y equipo médico que los ejercicios a continuación son apropiados para usted después de su cirugía.
The following exercises are recommended to help reduce swelling and pain, increase range of movement and strengthen the muscles around the hip joint and prevent future problems.
Lista de reproducción: Hip Replacement Recovery Exercises
5 videos
Hip Replacement Recovery - Range of Movements
Lilly Sabri, MHPC
Hip Replacement Recovery - Range of Movements
Lilly Sabri, MHPC
Hip Replacement: Hip Flexion with Lilly Sabri | Patient Physio
Lilly Sabri, MHPC
Hip Replacement: Isometric Exercise with Lilly Sabri | Patient Physio
Lilly Sabri, MHPC
Hip Replacement: Inner Range Quadriceps with Lilly Sabri | Patient Physio
Lilly Sabri, MHPC
Hip Replacement: Advanced Strengthening with Lilly Sabri | Patient Physio
Lilly Sabri, MHPC
Range of movement exercises
Please remember that these exercises can only be completed once cleared with your surgeon and medical team
.
Hip and knee flexion sitting on the floor
Sentado con las piernas estiradas frente a ti, apoya la espalda si es necesario.
Place a plastic bag under the heel and slide it towards your bottom, using your hands for support if necessary.
Slow and controlled, straighten leg back out to the starting position.
Repeat 10 times on each affected knee, twice daily.
Hip flexion/extension/abduction
In a standing position, support yourself by holding on to the back of a chair.
Flexion: stand sideways on to the chair and swing your leg forward, with the toes facing up towards the ceiling. Return the leg back to the start position.
Extension: stand facing towards the chair and, with a flexed foot, swing the leg behind you and return back to the start position.
Abduction: stand facing the chair and, with a flexed foot, lift the leg out to your side and back down.
Complete all exercises 10 times, twice daily.
Stretches for the muscles of the hip joint
Please remember that these exercises can only be completed once cleared with your surgeon and medical team
.
Estiramiento de cuádriceps
Párate con las manos apoyadas en el respaldo de una silla.
Dobla una rodilla y lleva tu pie hacia tu trasero.
Hook your hand around your ankle and pull the ankle closer towards the bottom to feel a stretch in the thigh muscle at the front of the leg.
Asegúrate de mantener las rodillas juntas.
Mantén el estiramiento durante 20 segundos; repite tres veces en cada lado, dos veces al día.
Hip flexor stretch.
To simplify, either hold on to your trouser legs or place a towel or band around the ankle. This can also be completed lying on your side with the operated leg up.
Estiramiento de isquiotibiales
Sit upright in a chair with both your knees bent.
Straighten the operated leg as much as possible and flex your foot - toes to the sky
Take your body weight forward - DO NOT PASS 90° at the hip.
Strengthening for the hip muscles
Please remember that these exercises can only be completed once cleared with your surgeon and medical team
.
Isometric quads
This a simple but very effective exercise for people with very week quads (particularly after surgery).
Sentado en el suelo, apoya tu espalda y coloca tus piernas rectas frente a ti.
Start by pushing one knee down into the ground, feeling the quad (thigh) muscle activate.
Mantén durante 10 segundos y repite 10 veces en cada pierna, dos veces al día.
Cuádriceps de rango interno
Comienza sentándote en el suelo, apoya tu espalda y coloca tus piernas rectas frente a ti.
Coloca una toalla de mano enrollada debajo de una rodilla.
Apunta tu pie hacia el techo antes de empujar tu rodilla hacia abajo en la toalla. Deberías sentir que tu talón se levanta del suelo.
Mantén durante 10 segundos y repite 10 veces en cada pierna, dos veces al día.
Elevación de pierna recta
A progression form the exercises above.
Sentado en el suelo, apoya tu espalda y coloca tus piernas rectas frente a ti.
Gira tu pie hacia afuera, empuja tu rodilla hacia el suelo antes de levantar la pierna del suelo entre 10-15 centímetros.
Mantén durante 10 segundos y repite 10 veces en cada pierna, dos veces al día.
Sentarse a pararse
Start sitting on a chair.
Without using your hands for support, stand up from the chair and then sit back down again in a slow and controlled movement.
Complete this exercise 20 times.
A medida que mejores, aumenta gradualmente el número de repeticiones hasta 50; también puedes intentar este ejercicio desde una silla más baja.
Sentadilla en la pared
Ponte de espaldas a la pared.
Coloca tus pies a la distancia de los hombros y alejados de la pared.
Desliza lentamente tus manos por la pared mientras bajas tu cuerpo a una posición de cuclillas.
Do not allow the knees to buckle in by keeping the knees directly over the middle toes.
Mantén durante 10 segundos y repite 10 veces, dos veces al día.
If you do not have access to a wall, you can complete a standing squat, ensuring your knees stay in line with your middle toes, your weight is distributed back through your heels and your chest remains proud and open. If you get an increase in hip pain, you should stop and seek professional advice.
Static glutes
Sit on a chair with your back supported.
Clench your bottom muscles together and hold for 10 seconds. Repeat 10 times, twice daily.
Bridge
Acuéstate de espaldas con las rodillas dobladas.
With your arms relaxed down by the side of your body, push through your feet and lift your pelvis upwards off the floor; in a slow and controlled movement, lower it back down. Make sure you feel your bottom muscles active as you lift your pelvis, by squeezing them together.
Complete this exercise 20 times, twice daily.
Selecciones del paciente para Cirugía y procedimientos

Tratamiento y medicación
Cómo es estar en la lista de espera para un trasplante de órganos
Lisa Ebdon, a recruiter from Warwickshire, does not come across as seriously ill. She goes to work, walks the dog and enjoys running with her daughter Lily. As she explains, it's only when she takes off her glasses that most people realise what she's dealing with. "People are shocked and surprised when they find out that I need a liver transplant. Then I take off my glasses and they see the 'yellows' of my eyes," she says.
por Abi Millar
Tratamiento y medicación
Las experiencias de un cirujano de vasectomía vasectomizado
No recuerdo exactamente cómo me involucré en hacer vasectomías. El socio principal saliente solía hacerlas en la práctica a la que me uní como médico de cabecera y creo que, como el nuevo, simplemente se esperaba que me hiciera cargo. Me enviaron a la clínica local de vasectomía para ser entrenado.
por el Dr. Laurence Knott
Sobre el autorVer biografía completa
Escrito por

Lilly Sabri, MHPC
Fisioterapeuta, Entrenador Personal
BSc Physiotherapy, MCSP, MHPC, MAACP, MACSPM
Lilly Sabri es fisioterapeuta colegiada, instructora de pilates APPI, influencer de fitness, salud y estilo de vida, y fundadora de #LeanWithLilly.
Acerca del revisorVer biografía completa

Dra. Sarah Jarvis
Consultora Clínica
MA (Cantab), BM, BCh (Oxon), DRCOG, FRCGP, MBE
Después de formarse en medicina en Cambridge y Oxford, la Dra. Sarah Jarvis MBE se convirtió en médica general.
Historial del artículo
Artículo también disponible en Inglés, Alemán, Español, Francés, Italiano, Portugués, Hindi, Hebreo, Árabe, y Sueco.
15 Dec 2017 | Publicado originalmente
Escrito por:
Lilly Sabri, MHPCRevisado por
Dra. Sarah Jarvis
Únete a la conversación
Comparte tus pensamientos o experiencias con otros en nuestro comunidades de pacientes.

Pregunta, comparte, conecta.
Navega por discusiones, haz preguntas y comparte experiencias en cientos de temas de salud.

¿Te sientes mal?
Evalúa tus síntomas en línea de forma gratuita
Suscríbete al boletín de Patient
Tu dosis semanal de consejos de salud claros y confiables, escritos para ayudarte a sentirte informado, seguro y en control.
Al suscribirte aceptas nuestros Política de Privacidad. Puedes darte de baja en cualquier momento. Nunca vendemos tus datos.